
The Pistol Squat: How to Build the Strength, Flexibility and Mobility You Need for This Pose
28th February 2020
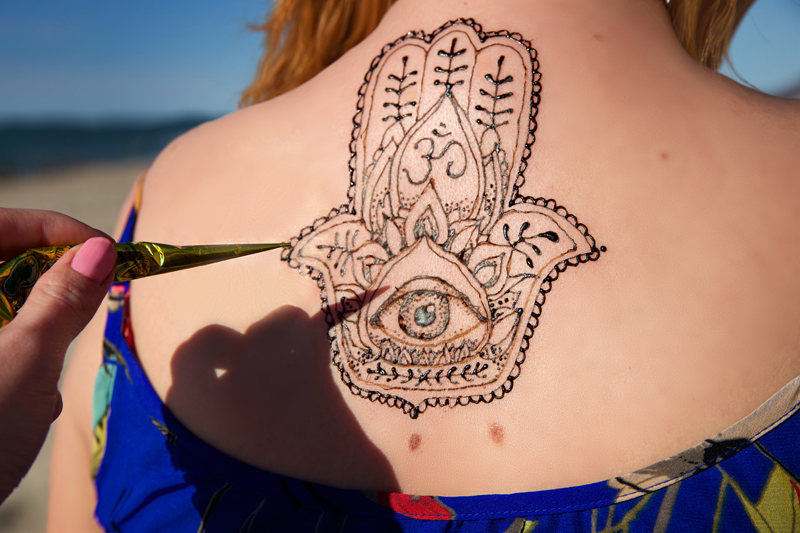
These Yoga Tattoos are Wildly Popular
6th March 2020Prop Yourself: 6 Surprising Yoga Prop Setups You Probably Haven’t Tried Yet
When you hit the yoga mat, do you go equipped with blankets, bolsters and a strap? Or do you tend to leave the props, thinking that you’re fine without them? If you fall into the latter category, it may be time to change your mindset and embrace props. While some postures are fine without added support, others can be drastically improved with a bolster or strap. If you’re not using them, you may be compensating or cheating to make the asana more bearable. As you can imagine, this isn’t a good option long term. Using props is the best way to stay honest and get the most from your practice every time.
This is true for even the most experienced yogis. Even seasoned practitioners have moments where a prop could be beneficial, particularly when practising alone. Contrary to popular belief, props have nothing to do with lack of skill or experience. Instead, they are about three things: understanding your body, building strength and accepting where you are in your practice. Are you ready to take your practice to the next level? In this article, we explore 6 surprising yoga prop setups you probably haven’t tried yet.
1. Foot Work with a Block
To practice this asana, begin on your back with your knees bent. Next, place a block between your feet and then lift your legs towards the ceiling. You are in Foot Work with a Block. Hold the position for 30 seconds, or as long as it feels comfortable to do so. Holding the prop here strengthens your toes, arches and inner thighs while training your legs and feet for more complex yoga poses. Basic, non-weight bearing asanas like this prepare the feet to be strong in standing postures, too. Strong toe extension and arch support are key for total core strength, so this asana can also help your body to feel lighter.
2. Advanced Tree Pose with a Block
To practice this posture, place a block on top your head while in tree pose. As you balance the block, learn how to use the strength from the bottoms of your feet to keep the block on top of your head. No matter what type of hair you have or what shape your head is, the block will help you to stack your pelvis and thoracic spine vertically. When you’re ready, press your feet into the ground and extend your body into the block. If the prop keeps falling, try drawing your stomach in and up, drawing the sides of your throat or the base of your rib cage back and extending towards the ceiling from the base of your skull. If you’re still struggling, try all three of these actions simultaneously. You are in Advanced Tree Pose with a Block. Hold the position for around 1 minute for best results.
3. Shoulder Opener with a Broom
Instead of using a standard yoga prop, this shoulder opener uses a household broom. To practice the asana, hold onto the broom and place it against your lower back. Holding the prop with both hands, gently roll it up towards your head until it won’t go any further. As you do so, breathe deeply and feel the pressure release from your shoulder blades, chest and shoulders. You are in Shoulder Opener with a Broom. This movement is great for your posture and prepares the body for backbends and shoulder stands.
4. Lateral Pulldown with a Strap
This asana uses a standard yoga strap. To practice, hold the strap above your head with your arms straight. Next, bend your arms and pull the strap down while lifting your chest towards the ceiling. Try to keep your body integrated and avoid letting your rib cage poke out. You are in Lateral Pulldown with a Strap. Repeat the process between 5 and 10 times for best results.
5. Salabhasana with a Strap
To practice this asana, begin on your stomach. Next, straighten your arms and extend the strap above your head. Engage your neck muscles by looking down at the floor, engage your hamstrings and glutes and raise your arms and legs simultaneously. After a few seconds, release the strap and place your hands beside your chest. Lower your legs and press your toes firmly into the floor as you come up into Cobra Pose. You are in Salabhasana with a Strap. You should notice how different the posture feels when all of your back muscles and engaged. If you notice any discomfort, lift your stomach and move your neck and ribcage back until you feel more supported.
6. Shoulder Stand Variation with Blankets and a Pool Noodle
For the final asana, you’ll need two blankets and a pool noodle. Using a sharp knife, cut the pool noodle in half and lay each piece side by side. When you’re ready to begin, lay your blankets on the ground and place the pool noodle on top so your spine can rest comfortably in the middle. Kick your legs over your head to come into Shoulder Stand, allowing your back muscles to sink into the pool noodles. You are in Shoulder Stand with Blankets and a Pool Noodle. The props will release tension in the back and neck whilst also giving you a deep tissue massage.
In Summary
So, there you have it – Prop yourself: 6 surprising yoga prop setups you probably haven’t tried yet. If you want to try out the sequence above, pop on a yoga bra and gather the props. If you practice regularly, it won’t be long before you notice the benefits of the sequence and want to introduce props into every session. Take our word for it!