
How to do sarvangasana pose in yoga
3rd July 2018
Letting Go
4th July 2018How to do Mountain pose in yoga
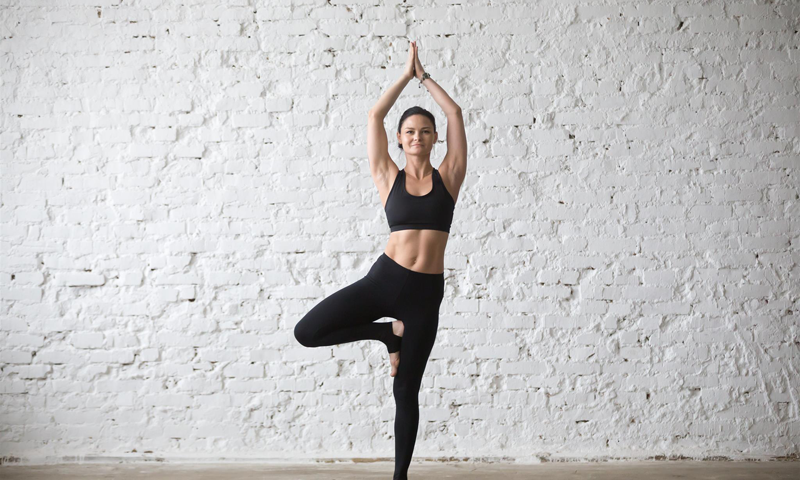
Mountain pose, or tadasana, is a foundation pose. It will look like you are just standing there – strong and rooted into the ground – well – like a mountain. However, this is a much more active pose than this. You should be working hard on your posture, your balance, your sense of calm focus. You practice tadasana to improve not only your posture, but also your sense of groundedness, your stability and ultimately, your confidence.
This is the beginning pose for most standing yoga postures and inversions. You would start in tadasana before attempting a headstand or a handstand, for instance.
The importance of successful tadasana practice should not be underestimated. It is easy to believe that you are not “doing yoga” at this point – but each time you set up in mountain pose you should do it correctly and create the muscle memory for the perfect posture.
The benefits of this pose
If you are doing this pose correctly, you will actually be using every single muscle in the body. It is a great pose for reducing back pain – which is usually caused by poor alignment – this is particularly true with sciatic pain. It can help to strengthen the legs – particularly the thighs, knees and ankles. It also helps strengthen the abdomen and the buttocks. It is even a good remedy for the impacts of flat feet!
It is very easy to fake mountain pose. Indeed, you can just stand there and wait for the “yoga” to get going again. However, if you are doing this properly, you should feel effort throughout the body.
Ultimately, success in this pose should bring a calm focus. You should work to steady your breath and in so doing relieve stress and tension.
Be aware that mountain pose can exacerbate feelings of dizziness or light-headedness. if you are struggling in this way, with low blood pressure for instance, it may be best to shorten the time in mountain pose or do it under supervision.
Instructions
It might be easy to think that you do not need instructions on how to stand up – but the postural problems that most of us live with would suggest we could do with some guidance.
- Stand with your feet together. Place your arms by your sides. Make sure the weight is pressed evenly through both feet – this is where the realignment of your posture begins.
- Focus on the present – noting your breathing or the feeling of the floor through your feet.
- Press your big toes together and lift the other toes so that you can spread them apart. For true mindfulness in this moment, try to replace each toe on the mat one-by-one.
- Straighten your legs by drawing through the heels. Ground all four corners of the feet into the mat – make sure the pressure is even into each of these corners.
- Arch your feet and draw up through the ankle, press your shins together.
- Now draw the top of your thighs up and back. You should feel an engagement in the quads at the front of the thigh.
- Rotate your thighs lightly inwards – this should widen your sit bones.
- Tuck the tailbone under ever so slightly. It will take some control here not to arch your back and keep your hips facing forward. To align properly you shouldn’t be arching the back or twisting to one side.
- Bring the pelvis into neutral position – pulling your hips in towards your ribs slightly. Remember this is a pose that engages the strength of your body – you should be feeling the effort of mountain pose right now.
- Lengthen the breath through your torso. You may want to imagine the breath entering the body and travelling down the front and then exhaling through the back, up to the crown of your head and out.
- Broaden your chest, extending along the shoulder blades. Don’t squeeze the shoulder blades together, just puff your chest out.
- Straighten the arms and extend through the fingers – keeping the triceps firm.
- Lengthen the neck – with your ears well away from your shoulders.
- Hold the strength in the pose whilst examining your breathing. Remember to keep the spine elongated and strong.
- Soften your gaze and keep your awareness with your alignment – are your hips forward? And, do not arch the back.
Tips
If you want to increase the challenge of maintaining the balance – close your eyes. Keep your awareness on the back and on the alignment of the hips – whilst inhaling and exhaling mindfully.
Remember, if prone to dizziness, do not hold the effort in this pose for too long.
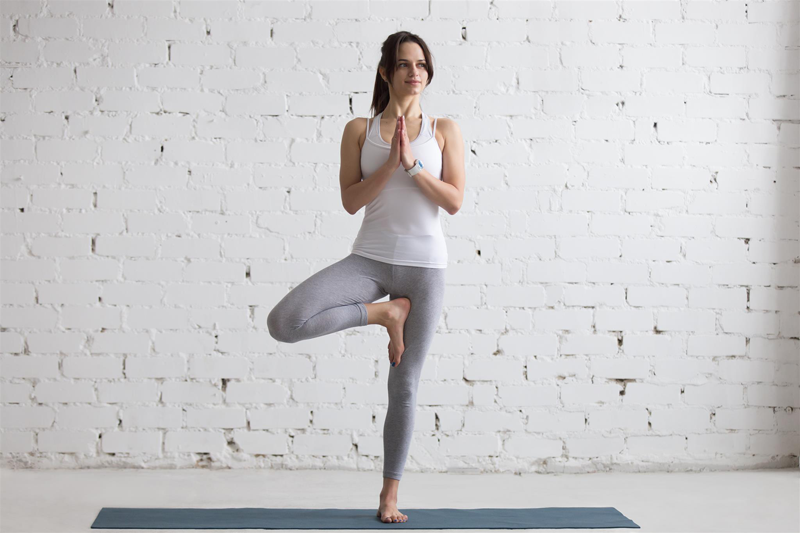
For correct alignment it is important to keep your palms facing inward. Some people prefer to use the prayer pose – also known as Anjali Mudra.
Modifications and Variations
Some people find it particularly difficult to balance with the feet together – especially with the big toes touching. Therefore, if you need to you can begin with the feet hip distance apart and then gradually, with time and practice, drawing the feet together. If needs be, you can practice with your back again the wall. This will curve your lower back more and you need to be mindful of this impact. It is also easier to draw your shoulders to your ears when at the wall.
To perfect the pose
Remember, this is an active pose. You are not just standing up. The pose is meant to ground you and strengthen you. The good news is that you can practice mountain pose throughout the day – when standing in line for coffee at work, in the queue at the supermarket or whilst cooking the evening meal. With regular focus on the muscles that activate when standing, you will improve posture and therefore reduce the chance of back pain.